User Manual
What is Tagaini-Jisho?
Tagaini Jisho is an open source1 Japanese dictionary application. It is designed to help students of the Japanese language in their study by providing powerful tools to search, organise and study Japanese vocabulary and kanji entries.
Search
- Complete Japanese vocabulary and kanji Dictionaries, with more than 140,000 vocabulary and 12,000 kanji entries;
- Full wild-card support in textual search;
- Radical and component-based kanji look-up, including an input method that lets you find almost any kanji, as long as you can recognise some of its components;
- JLPT classifications of vocabulary and kanji.
Organise
- A study list that keeps track of all the vocabulary and kanji entries you wish to study;
Setslet you easily remember any search, allowing you to quickly access queries like “What were the JLPT-2 kanji that I added to my study list this week?”;- Notes and tags can be applied to entries, allowing you to group entries in a way that makes sense to you;
- Hierarchical and ordered lists provide an easy way to classify vocabulary and kanji found in textbooks or to organise them arbitrarily.
Study
- Stroke order animations for more than 6000 kanji;
- Kana panel that allows the study of hiragana and katakana;
- Transparent connection of related entries, including transitive / intransitive verb references, Homophones and Homographs. Tagaini maximises the logical connections between elements of the Japanese language in order to facilitate their memorisation;
- Flash cards for vocabulary and kanji entries that remember which entries you are having difficulty memorising so that Tagaini may display them more frequently.
- Production of printed material, including a handy fold-able booklet to study anywhere.
This version of the Tagaini Jisho documentation has been written using Tagaini Jisho 0.2.6. It is possible that some aspects of the program have been left out or are ambiguous. If so, please feel free to contact the author or the Tagaini mailing list. Contact details can be found in the [contact section][Contact] on either the website or this document.
The GUI
Tagaini Jisho’s GUI, when opened for the first time, displays the search panel (upper right), the lists view (left), and the detailed view (bottom right).
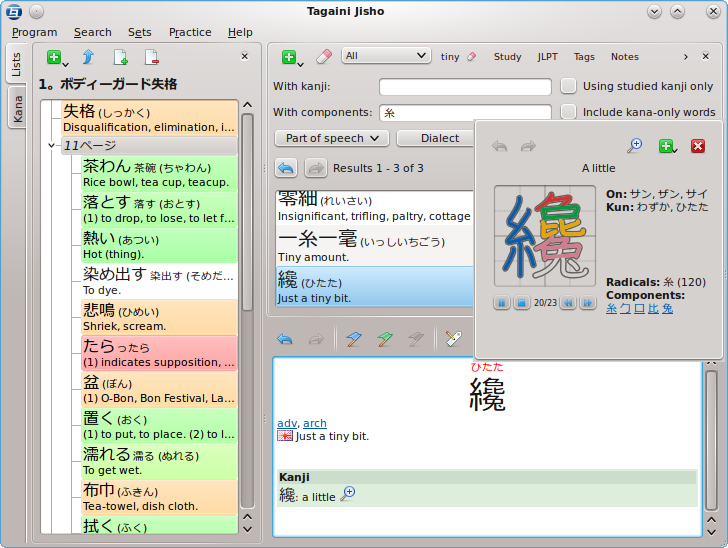
The search panel provides a series of search filters that allows you to perform queries according to some search criteria. In order to avoid cluttering the GUI with the many search options, only one filter can be visible at a time, when you click its button. Once a search is run, its results are displayed under the search filters, in the form of a short description that allows you to spot the ones you were specifically after. The area this list is shown in is called the results view.
Tagaini remembers your searches, and you can go back and forward through them using the left and right arrow at the top left of the results view, next to where it displays the number of results. By default, the results view will only list up to 50 entries. Beyond that, they will be put on a new page. Which page you are viewing is controlled with the buttons at the top right of the list.
Below the search panel is the detailed view, which displays any and all information about a selected entry. The buttons above the view allow you to go back and forward through selected entries and to manipulate the displayed entry.
When you right click on an entry in the results window, a context menu opens. In the context menu are the same actions that are along the top of the detailed view, as well as a Select All option. Right clicking on links to other entries in the detailed view has the same effect, and provides an Open in detailed view… option which opens the entry in the detailed view. You may also left click on the link or magnifying glass icon to access referenced entries.
Tagaini’s views can also be resized, moved or hidden in order to adapt the interface to your current activity, available screen surface, or way of working. To hide a panel, simply click on the x icon at the right of their toolbar. A hidden panel can be made visible again using the corresponding action in the Search menu or its keyboard shortcut. Clicking and dragging on a view’s toolbar will let you detach and move it around the workspace.
Searching Entries
Tagaini Jisho is, above all, a very powerful dictionary program. It allows you to search for terms and kanji even if you have limited information about them, and connects them to related entries. This chapter covers the basic usage of the application.
Any search for vocabulary or kanji entries takes place in the search panel. It’s top bar features a couple of buttons, as well as accessors to the various search filters.

The first button displays a list of print/export options to apply to the currently displayed results, and is explained in a latter section. The second button lets you reset the current search, bringing the search panel back to an empty state. It is also accessible through the Ctrl+r shortcut
The drop down box to the left of that is the entry type selector, and lets you filter which type of entry you want to search. Tagaini references both dictionary (words) and kanji (characters) entries, and by default searches for both type of entries. But some searches may only make sense for one type - for instance if you want to specifically study kanji for a test.
Next are labelled buttons which give you access to the various search filters. Tagaini lets you search for entries according to many different criteria, each one being accessible through its own filter that appears if the button is pressed. When a search filter is in use, a reset button similar to the search panel’s reset button will appear on the filter’s button. This button will only reset search options within that filter.
The last noticeable element of the search panel’s toolbar is the Tagaini logo, which will animate as a search takes place. You can stop a long search by clicking it.
There are seven search filters located in the view’s toolbar. By default [Text Search][The Text Filter] is selected, and the text search filter is displayed. The other search tabs are labelled: [Study][The Study Filter]; [JLPT][The JLPT Filter]; [Tags; Notes][The Tags and Notes Filters]; [Vocabulary][The Vocabulary Filter]; [Kanji][The Kanji Filter]. Clicking on a different filter shows the new filter in place of the current one. It is also possible to select a filter through keyboard short cuts. Holding down control (ctrl) and pressing the corresponding number, one through seven (1 - 7), while Ctrl+0 hides them all.
The Text Filter

The text search filter is used for entering textual search terms. The text field also acts as a drop down box, allowing previously searched terms to be found and reused easily. You can enter words, or terms, to search for into the text field and then, when you either press the enter key or the search button, it will search for the terms in the search bar.
Search terms are character-set sensitive and can be combined. For instance, if
you enter “しけん” into the search bar it will result in 試験 (test), 私見
(personal opinion) and 私権 (private right.) If, however, you enter “しけん test”, it will search both terms and only display 試験 (test) as Tagaini
will only display entries for which all the search terms match.
Every search term is separated by spaces, or double quotes (""). To search
for a sentence which includes spaces, you can enclose the sentence in
quotation marks. For instance, if you search for to run, then Tagaini will
find and list every entry with both the word to and run in it. If instead
you search "to run", then Tagaini will only find entries with the words “to
run” in them in that order, which probably makes sense if you are looking for
the verb.
As Tagaini matches terms to entries exactly, there is currently no romaji
search. So, searching for “watashi” will not result in 私:わたし. To find
an entry you must search either its kanji or hiragana reading.
When searching single-character words with the entry type selector set to All, it is quite common to come across two similar-looking entries, such as two entries for 私 or 駅. These entries will usually come up for single kanji words. This happens because it is displaying an entry for the word, and an entry for the kanji. The two different entries will have information about different things. This is discussed further in the next section.
Tagaini supports wild cards2. The * character represents an
unknown string. Placing it at the end of a term searches for everything
beginning with that term, placing it at the beginning of a term searches for
everything ending with that term and placing it in the middle of the a term
searches for everything that starts and ends with that part of the term. The
? character represents a single unknown character but otherwise works the
same way. So 大* represents everything that starts with 大 and *す
represents everything that ends with す. If the ? character was used instead
then then 大? would be any two character entry where the first was 大 and
?す would be any two character entry that ends with す. Wild-cards are
especially useful for looking up a word you cannot read entirely.
The Study Filter
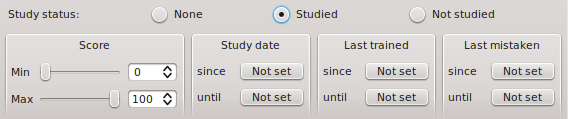
The study tab filters through searches according to whether or not the entry is on the study list. Tagaini indeed lets you mark entries you want to study and keeps lots of statistics about them, including a score that represents how well you remember it. The study status defaults to None, so it does not filter results. Changing this to Studied will cause only entries in the study list to be listed in the search panel. Not studied causes only results not in the study list to be shown3.
To add entries to the study list, either right click on them in the results view, or use the detailed view toolbar and click the blue flag, Add to study list, which adds the entry to the list with a score of 0. The green flag, Already known, will add the entry with a score of 95.
Each entry is given a colour between red and green according to its score, and it is displayed as the entry’s background in the search panel. As you practise4, the score on each entry in your study list will change. You will then be able to filter entries that you know you know from your searches. When the study status is set to studied Tagaini will only search through entries that have a score within the range of Min and Max, the values from the score section.
The study date section filters entries according to the date the entry was added to the study list. Clicking any of the not set buttons, in this section or the others, brings up a calendar to select a date or allows you to set a number of days/weeks/months/years prior to today’s date. If an entry has been added after the since date and before the until date then it will be listed in the search panel in any searches.
The last trained section allows you to set a time range for finding entries according to when you last practised it, and the last mistaken section allows you to set a time range for when you last made a mistake on the entry.
The JLPT Filter
JLPT stands for the Japanese Language Proficiency Test. It is a test administered by the Japan Foundation and Japan Educational Exchanges and Services for the purposes of evaluating and certifying the Japanese language proficiency of non-native speakers.5
Up until 2010 there have been four levels, with level 4 being the lowest and 1 being the highest. The JLPT filter lets you filter vocabulary and kanji entries according to the JLPT level they are likely to show in. You can check several levels. Please keep in mind that although this information can probably be considered reliable, it is only given for informational purposes, as there is no official JLPT lists of vocabulary and kanji.
Starting from 2010, there are 5 JLPT levels - former level 4 corresponds to N5, former level 3 to N4, former level 2 to N2 and former level 1 to N1. There are not as yet vocabulary lists of known vocabulary associated to the N3 level.

The Tags and Notes Filters
Tags and Notes are similar in that they both label entries. They can be added to entries with either the right click menu in the search panel or the detailed views toolbar.

Tags are short strings used to identify an entry. Each tag is a single word given to an entry that can be used as a filter. For instance, if you first come across a word in a given book, you can mark it with the book’s name so that you are able to quickly find entries you learnt in the same context. Typing tags into the filter will search through just the entries with those tags. There is also a drop down list to the right of the text field which contains a complete list of tags, so you can just select the ones you want.
If an entry has a tag, a small tag icon will be displayed on the right side of the entry in the search panel, next to the scroll bar and at the bottom of the entry in the detailed view.
To add a tag, you can use the Add tags… button, which looks like a tag
with a green bit at the top. White space, or spaces, separate each tag, so
writing “genki ch04” adds two tags: “genki” and “ch04”.
Any tags you have added with the Add tags… button in the current session6 can be found again in the Recently added tags… sub menu of the context menu7, which makes adding tags to a set of entries easier. The Set tags… button brings up a list of all the current tags attached to an entry so that they can be edited. Additional tags can be entered here. Despite the Add tags… button not bringing up tags that have already been set on an entry, adding new ones does not overwrite the existing ones, it just appends them to the list.
Notes are like yellow post-it notes that you can add to an entry. You could
use notes to describe the relationship between one word and another or any other
information you judge note-worthy about the entry. For instance, if a word,
such as 降る、appears in a textbook you are studying in a phrase, such as
雨が降る/雨が降ります、in a chapter before the entry itself, you may wish note
that in the entry. In the example one may write “Appears in chapter n of textbook_name as 雨が降る”.
When you search with the Notes filter, the search will match any entries
with whatever text you write in the text field, exactly. If, using the above
example, you have two different entries on verbs that have been used in
phrases and have noted this, if you search for “Appears in” it will find both
of these entries, however if they are in separate chapters and you extend that
string to “Appears in chapter 5”, then it will only find the one that has that
exactly.
To add a note, use the Edit notes… button, which looks like a yellow stick-it note pad and a pen. It will bring up a window with any existing notes. You can edit existing notes by selecting them and editing them, add new notes with the New note button, and delete notes.
The Vocabulary Filter

The vocabulary filter has vocabulary specific filter options. It can not be used in conjunction with the kanji filter.
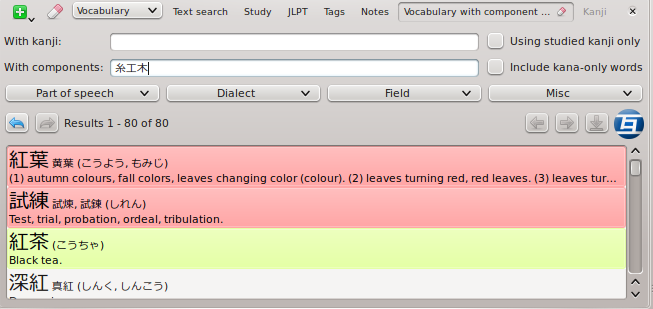
The first two text fields relate to the kanji found in vocab entries. The With kanji field will find any vocab entry that contains a list of given kanji. Next to it is a check-box labelled Using studied kanji only. It forces the search to use only kanji from the study list, and may be useful to find new words that you should be able to read, but are not necessarily studying. If you also want to include words that are made of kana only in your search, check the Include kana-only words box.
Kanji are made up of different sub-kanji, or components, so the With
components field searches for kanji that include a component. This feature
is useful to find words that you cannot write, but for which you can identify
some of their components. For instance, say you are looking for the word
“紅葉”. You cannot read it, but can recognise the 糸, 工 and 木
components it its kanji. Entering these in the components line will display
all words which kanji feature these components, including the one you are
looking after, 紅葉.
Below that are four sub menus, labelled Part of speech, Dialect, Field and Misc. Each of these finds entries that belong to any of the groups you select in the menus. The Part of speech menu allows you to search for different parts of speech, such as nouns or verbs; Dialect finds words that belong to different places in Japan; Field finds terms and jargon from different fields and schools of knowledge, such as computer or religious terms and Misc contains anything that doesn’t belong in the other categories, such as children’s language, obsolete terms and slang.
The Kanji Filter

The kanji filter contains filtering options specific to kanji entries and as such cannot be used in conjunction with the vocabulary filter.
The first section on the tab, Stroke count, filters kanji by their number of strokes. It is possible to specify a range by checking the corresponding check-box.
The next section filters kanji by their radical or components. Clicking on the Radicals input line will trigger a pop-up listing the 214 radicals, from which you can select those you want to filter against. Every time a radical is selected, the radicals list updates itself to only show the radicals that can be combined with the current selection.
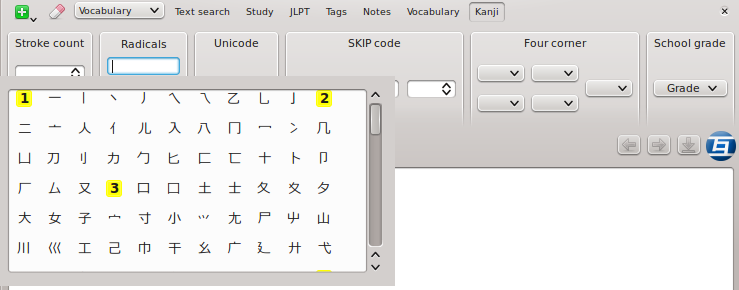
Components, acts in the same way as radicals, but broaden the concept. While radicals are limited to a set of 214 key characters, a component can be any part of a kanji for which a character exists, which makes searching using components much more flexible. You can click on or input just any component that you recognise in the kanji, and the list of complementary components will update itself automatically, while the search for corresponding kanji is run in the background.
Radical and component-based kanji search are very powerful kanji look-up methods. They can also be used to insert kanji into any text input, including the text search widget, using the [Kanji Input Panel][].
The Unicode section, in the middle of the tab, finds the character with
the Unicode value 0xH where H is a hexadecimal8 value representing
the number. No two characters have the same value. For instance, the character
取 has a Unicode value of 0x53D6. Putting that in the Unicode field will
result in the entry for 取 being listed.
The next section is for finding kanji by SKIP code. A skip code is a way of categorising kanji according to its type. SKIP codes are comprised of three numbers and are annotated X-Y-Z. Each slider in the SKIP code section relates to one of these numbers.9
The fifth section, or second from the right, is labelled Four corner. It provides four drop down boxes corresponding to each corner of a Chinese character and a fifth box for miscellaneous strokes. Four corner method is a Chinese input method to used to find kanji.10
The last section, School grade, represents which Japanese school level the kanji is taught in.
The Detailed View
The detailed view is the main window of Tagaini Jisho where entries are displayed. It is the only view that cannot be hidden. If both the search and the lists panels are hidden, then it is the only part that remains, showing entries. This can be useful if you are reading digital text and are using the auto-search on clipboard content feature found in the Search Menu.
At the top of the detailed view there is a toolbar which contains back and forward buttons, for transversing previously viewed entries; buttons for marking the entry, as discussed in the [organizing entries][] chapter and sections on [tags and notes][The Tags and Notes Filters]; and a button to allow dragging the entry currently being viewed into a list.
The detailed view itself displays all the information on the currently selected entry, according to its type. [Vocabulary entries] are displayed differently to [Kanji entries].
Vocabulary Entries
Vocabulary entries contain information about a word, particle or expression. The following sections are common to them.
- Main Reading
- Centred at the top of the view will be the way the word or phrase is written, with furigana written in red above it.
- Variants
- Any variants are listed here, with their reading in brackets.
- The definition block
- Here, different definitions are listed. First, it displays the definitions part of speech11 in grey, and then lists different definitions, next to a flag representing the language of the definition.
- JLPT level
- The entry’s JLPT level.
- Kanji
- The kanji used in the main reading, and its meanings. This is off by default. The kanji’s JLPT level can also be appended to each reference.
- Transitive/Intransitive buddy
- The entry corresponding with the current entry’s opposite transitive state.
- Homophones
- Entries that are homophones of the current entry. A homophone is a word with the same or similar pronunciation.
- Homographs
- Entries that are homographs of the current entry. A homograph is a word that is written the same way as another word with a different pronunciation and meaning.
Any entry referenced in the detailed view will have a little magnifying glass next to it, which is a link to the referenced entry. For instance, in the entry 取る it references its intransitive buddy;
Intransitive buddy: 取れる(とれる): to come off, to be removed.
Clicking on the magnifying glass at the end of this line would display the entry for 取れる in the detailed view. This does not affect your current set.
Kanji Entries
Kanji entries contain information about a single kanji, what it means and how it is used. By default, the kanji is centred in the detail view window and its meanings are listed underneath it, also centred. From there there are several common sections.
- On
- The on reading, or 音読み(おんよみ)is the Chinese reading of the kanji. It is written in katakana.
- Kun
- The kun reading, or 訓読み(くんよみ)is the Japanese reading of the character. It is written in hiragana.
- Nanori
- The name readings of the kanji, or 名乗り(なのり)are readings that are only used in names.
- Strokes
- The number of strokes it takes to write the kanji.
- Grade
- The grade it is taught to in Japanese schools.
- Unicode
- The Unicode number, in hexadecimal.
- Frequency
- How frequently the kanji appears in newspapers.
- JLPT
- The kanji’s JLPT level.
- SKIP
- The kanji’s SKIP code.
- Radicals
- Formal radicals found within the kanji.
- Components
- The components that make up the kanji.
- Direct compounds
- Kanji that are made up with this kanji.
- Seen in
- A list of vocabulary that contains the kanji. Following 6 words have been displayed is a link to find all words using that the kanji.
Although kun readings for some entries, such as verbs and adjectives, can include any extra kana needed to use the kanji, such as 取る’s る (written と.る,) searching the full reading, including extra kana past the full stop, will not find the kanji entry, only the vocabulary entry. To find the kanji entry you must search for just the kanji’s reading, と in 取る’s case, to find it.
In the detailed view, you can click on any kanji, whilst looking at any entry, and a pop up window will be displayed showing a short listing of the kanji, and a stroke order animation. This works in both a kanji entry and a vocabulary entry. Whilst in a kanji entry, one can also click ctrl+s to display the pop up window.
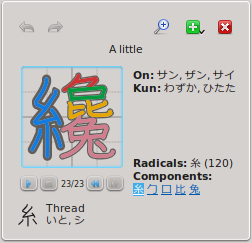
The small window will pop up under your mouse. It shows the kanji’s meaning, some of its readings, Frequency, Grade and JLPT, and components. Most notable, however, is the animation of the kanji being written. It starts as an outline which gets filled in, stroke by stroke. Each radical is written in a different colour.
Moving your mouse over a component highlights it. Clicking on a component, either on the animation or in the list, will open that component by itself in the window. Underneath the stroke order animation are animation control buttons, allowing you to stop; pause; play; skip strokes and go back. Each of these buttons have corresponding keyboard shortcuts: r, space, right and left respectively.
Up the top are three buttons. The first, the magnifying glass, opens the kanji’s entry in the detailed view. The second provides an options menu, just as when right clicking on an entry in the search panel, and the last closes the window.
Radical and Component Input Panels
The kanji input panels are a powerful way to easily input kanji into any text area of Tagaini Jisho. They are usable whenever a text input area (such as the text search filter) is focused (when you can type in one), either via the Search menu of their keyboard shortcuts. The Radical search input is accessible via Ctrl+k, and the Component search input via Ctrl+j.
Both work similarly to the radical and component search of [the Kanji Filter], excepted that the results are displayed in a small area. Clicking on a kanji displayed in this area will immediately put it into the focused text field.
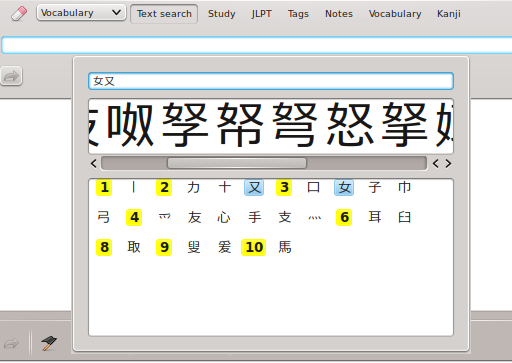
So to find 怒 using the components search input, one could start by entering
“女” into its text field, or by finding it listed under 3 strokes. The same
thing could be done for “又”. The field beneath would be listing
kanji with these radicals. With this example, the desired character, 怒, can
be spotted very quickly. Clicking on the kanji will place it in the search
field, or which ever text field had the focus when the kanji input panel was
brought up. To close the panel, just clicking outside it will close it.
Organising Entries
Study List
The study list is an invisible list of vocabulary and kanji, used to mark entries for study. Each entry has a score, based on how well you know the entry. This score is represented by a background colour for the entry when listed in the search panel. Red represents not knowing it, or having a 0 score, and green represents knowing it, or having a score of 100. The colour gradiates from red to yellow to green as the score gets higher. Entries with low scores are shown first.
The study list is manipulated with the flag buttons in the detailed view tool bar and the context menu given when right clicking on entry references, either in the search panel or the display view.
When adding entries to the study list, there are two relevant flags. The blue flag, Add to study list and the green flag, already known. The blue flag adds the entry with a score of 0, whilst the green flag adds the entry with a score of 95.
After an entry has been added, the blue flag changes colour and becomes a black flag, which removes the entry from the study list. Another flag, which was previously greyed out, also becomes available. It is a red flag and marked Reset score. It sets the entry’s score to 0.
An entry’s score goes up and down as you practise it.
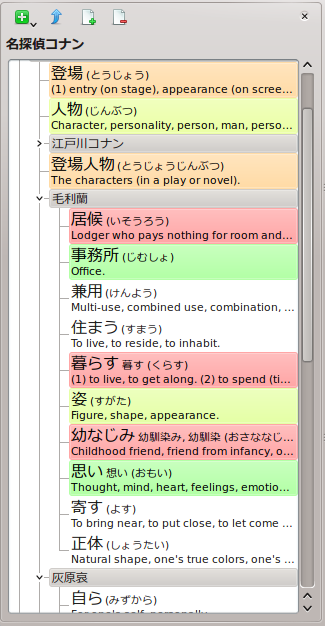
Lists
By default, Lists should be visible as soon as you start the program as a panel down the left of the window. If it is not, you can access it through the Search menu or the F3 keyboard shortcut.
In addition to an export/print menu similar to the one of the results list, the lists panel has three buttons. The first, which is greyed out to begin with, is the go up button. The second creates a new list and the third, a red x, recursively deletes the selected list and all its contents.
Each list is a tree branch in the list view panel. When a new list is created,
it does not have a parent and is named New list. Double clicking on the
branch will allow renaming. As every list is a branch, clicking and dragging
them onto another list will set it to be a child of that list, allowing this
lists to be embedded within each other.
Lists are useful for sorting and organising entries that may be frequently viewed. To add an entry to a list, Drag and drop it onto one of the lists from the search panel. Doing this creates a child entry that links to that entry. Clicking on it in the lists view then opens the entry in the detailed view. You can drag from the search panel, the list view (in which case the entry will move), the drag button of the detailed view’s toolbar, or any kanji or link in the detailed view.
To delete a list and its contents, select it and click the button that looks
like a red x. This will display a warning that points out that the operation
will delete the list and all of its children.
Selected entries options, as well as the create and delete actions, are also available through the right-click context menu.
Right clicking on a list in the list view will give the option to Set as root. Clicking on this hides all the lists and only shows children of the selected list. The list’s name will be displayed just below the panels tool bar. When you have set a list to the root, the go up button on the panel will turn blue to signal it is usable. Clicking it will set the root to the parent of the current root, until the root is the original root.
Sets
A set is the list created by a search and displayed in the search panel. Tagaini can remember specific sets. If you have made a search that you think you will want to make again, such as all transitive verbs used in computer terminology at the JLPT 2 level, you can create a new set, to make it easier to find again. Think of sets as bookmarks for searches.
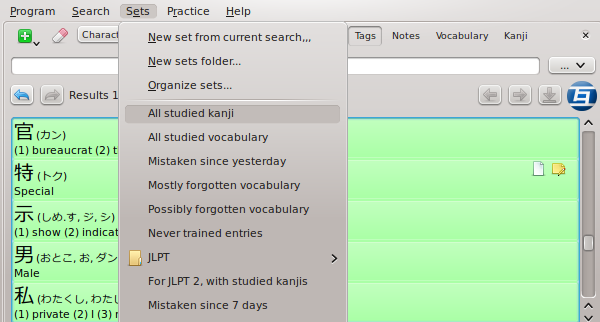
The Sets menu contains functions for creating and organising sets. Two options allow the creation and placement of sets directly from the menu, New set from current search… and New sets folder…, and the last, Organise sets… Brings up another window for organising sets.
As you create new sets with the menu option, it displays them at the bottom of the menu. Clicking on them there will open that set in the results window.
When you create a new menu, it too will appear in the sets menu, as a sub menu. It will then have two options, Create new set here… and Create new folder here…. They will act as the two options in the main sets menu, except they will place created sets and folders as sub items of that folder. These two options always appear at the bottom of the menu.
To organise or reorganise sets, The Organise sets window, found in the sets menu, allows you to drag and drop sets into different folders, as well as delete them. Double clicking on a set or folder will allow you to rename it. Right clicking on the set will allow you to delete it and dragging them around will move them to the new position. This allows you to sort them amongst themselves as well as into new folders.
The Kana Panel
Hiragana and Katakana are the first things any Japanese learner should study and remember. Tagaini offers a kana panel, accessible through the F4 keyboard shortcut or through the Search menu.
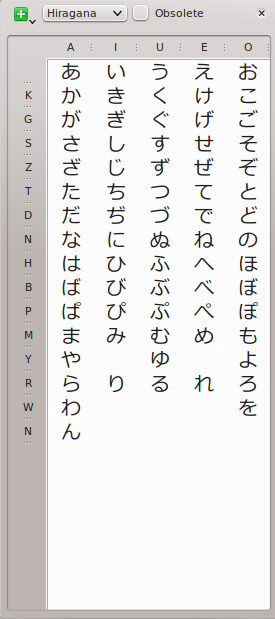
It just displays the Hiragana or Kanakana character set, and let you choose whether you want to display obsolete characters or not. You can click on a character to display it in the detailed view, and then click on its title to display a stroke order animation. Kana characters can also been put into your study list, tagged, printed and so on - just make a selection of characters by pressing the ctrl or shift keys and clicking on them, and use the right-click or top-left menu.
Studying Entries
Practice
The practise menu has four different options. Settings; vocab flash cards; character flash cards and reading practice. The flash card options are sub menus, each with by set and entire study list options for reading to translation and translation to reading.
The settings window, brought up by clicking the Whole study list train settings… buttons, allows you to set what to include and exclude in study exercises. The date of last training section specifies what to include based on the last time it was studied. It defaults to before yesterday, so it won’t include anything that you have already studied in the last twenty four hours. The score section specifies what to include based on score. If you only want to study things you are less familiar with you can change it to between 0 and 50 and it would only show you red to yellow entries. The sort bias specifies if entries with a low score should be more likely to appear before entries with higher scores.
Flashcards
There are four options in total in the flashcards sub-menus: From Japanese, whole study set; From Japanese, current set; From translation, whole study set and from translation, current set. Each option will display different contents in the same window. It will either show the translation or reading first, from an entry that has been pulled either from the study list or the current set.

The flashcard window has four buttons up the top; Answer and Skip, as well as two initially greyed out options, Correct and Wrong. Underneath this is a detailed display window. It will only display part of an entry initially. Either the Japanese if you have selected from Japanese, or the definition.
If you have selected a from Japanese option for vocabulary flashcards, then there is an extra option along the detailed view toolbar, Show furigana, a check-box which toggles whether or not the furigana for the entry is displayed.
When you have decided whether or not you know the answer, pressing the answer button will display the rest of the entry, just as it would in the detailed display. You can then tell Tagaini if you got it correct or incorrect, which modifies the entry’s score, or skip the entry, which doesn’t change it at all.
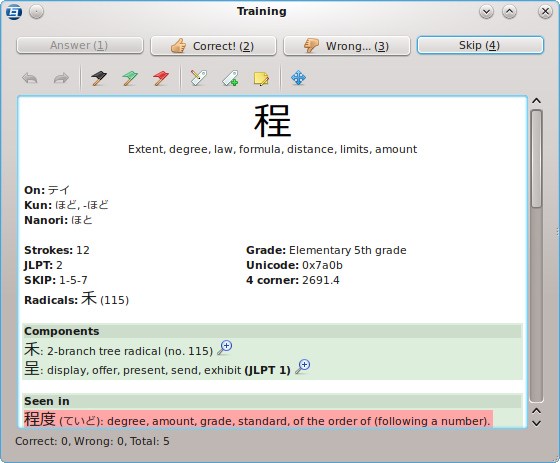
Whilst the whole entry is displayed, you can use the detailed view as normal, however the toolbar is greyed out before hitting the answer button. When you tell Tagaini how well you remembered the entry, it goes to a new entry at random, and you can repeat the process until you have run out of entries in the set. Down the bottom of the view some statistics are displayed.
Correct: 5, Wrong: 1, Total: 6
The numbers correspond to how well you are doing in that particular set. Every time you start using the flash cards, even with the same set, the numbers are all set back to 0.
Reading Practice
The last option in the practice menu is reading practice, whole study set. It brings up the reading practice window, which is a bit different to the flash card window.
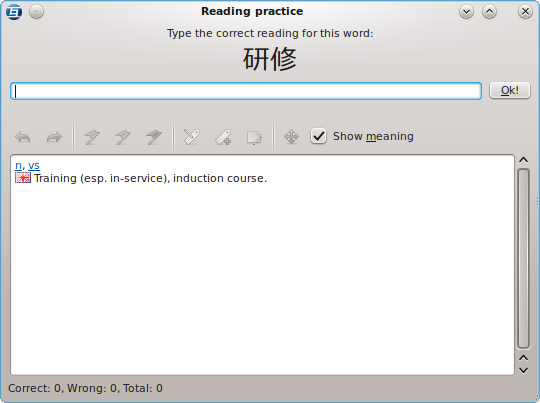
The window shows you a vocab entry’s written form, and asks you to type the correct reading for the entry. Underneath the text field, it has a detailed display which shows only the entry’s definitions. You must type the entry in kana (かな) to get entries correct, it will not accept romaji answers, though it does not mind if the answer is in hiragana ひらがな or katakana かたがな.
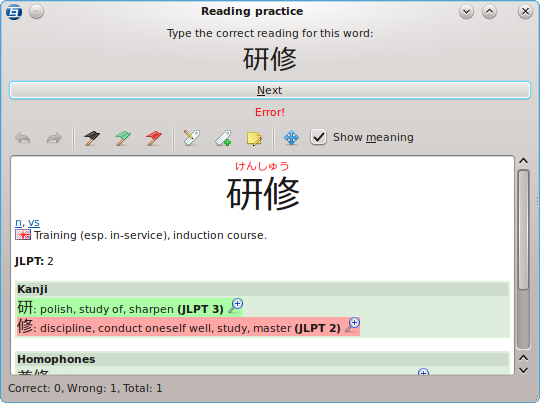
When you get the answer correct it displays the word Correct in green writing between the detailed display and the text field and moves immediately on to the next entry. When you get the entry incorrect, however, it displays Error! in red writing between the text field and the detailed view and changes the text field into a long next button. The detailed view shows the entire entry so you can see where you went wrong. When you press the next button it will show the next entry.
Printing and Export
Tagaini is a computer application, and some of the best times to study are those long hours spent commuting on trains, in waiting rooms or, for students, between classes. Unless you drag a laptop around with you everywhere, you won’t have access to Tagaini or its study features, so instead you can print out sets from the results or lists view, by selecting the desired print option from the menu of the first icon in their tool bar.
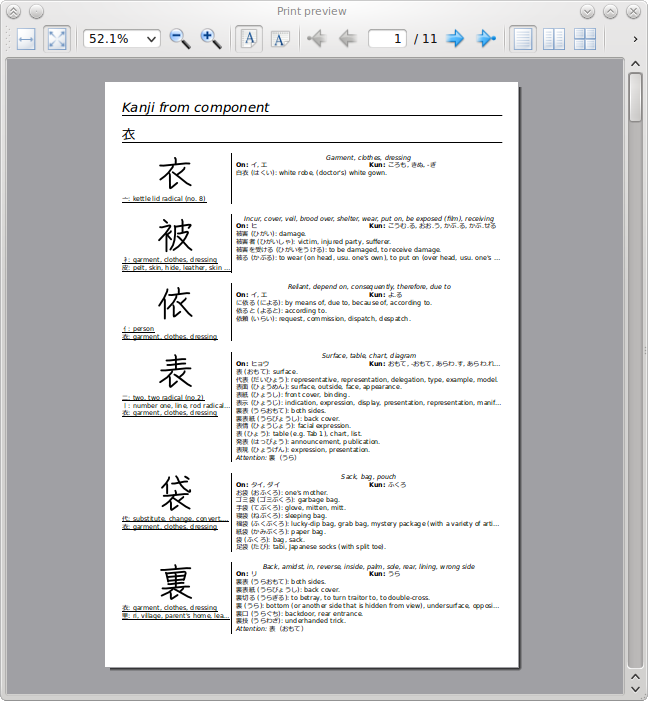
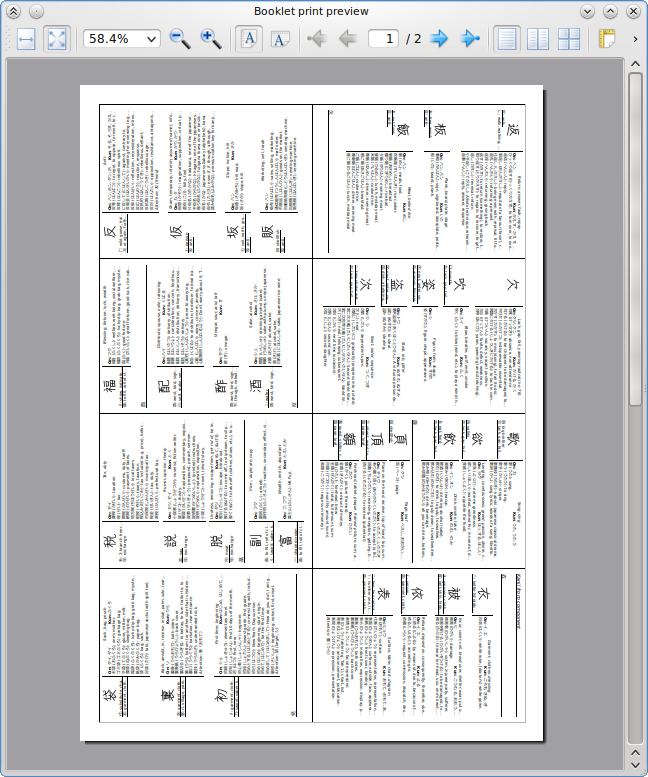
Tagaini can print two different types of paper media. Lists of vocabulary or kanji, and pocket-able booklets, vocabulary and kanji lists formatted in such a way that the paper can be folded into a small, pocket sized, book. The print option prints normally formatted lists, whilst the print booklet option prints out booklets. Each option also has a preview option.
What is printed is limited by what is in the results window. If a search has turned up 60 entries, and Tagaini is set to only show 50 of those entries on a page, then Tagaini will only print those 50 entries
At the bottom of the print menu there are two more options. Export as TSV… and Export as HTML…. The TSV option exports the set or list as a tab separated file. This option exports entries as a plain text file, with entries formatted:
漢字 かな Romaji
or
Expression Reading Meaning
This was originally written for exporting to anki12, a flash card program, but will work with any other application that can import entries in this format.
The export to HTML option exports a single HTML file, or web page, that can be opened in a web browser. When opened in a Web browser it will, at first, display a large box in which will be a single entries meaning and reading. This box will display each flash card in the set once. The start button bellow the frame will shuffle the flash cards and start showing them from the beginning. The next button is used to go to the next entry. Across the top are two radio buttons that read Writing and Meaning + Reading. Checking the Writing button causes the next entry’s kanji or writing to be displayed.
The menu button, just to the right of this (currently a big X) displays a menu with two options: List and Flashcards. Choosing the list option changes the page to display a list of every entry in the exported set. The Flashcard option returns you to the flash card page.
Importing and exporting user data
User data can be exported and imported from Tagaini. This allows you to move study lists, tags, notes and other things Tagaini remembers between versions. The export user data item in the program menu saves out a small data base with these settings, so that another instance of Tagaini may load it, whether it is another user on the same computer or on a different computer altogether.
Preferences
The preferences window provides the ability to edit Tagaini’s look, feel and how it handles several things. It can be opened via Program -> Preferences.
It is a window with a menu down the left, containing the different pages. Options for each page are located on the right of the menu.
General
The general preferences page, the one that the preferences window opens on, contains general settings that affect the entire program. It is broken down into several sections, visibly separated on the page.
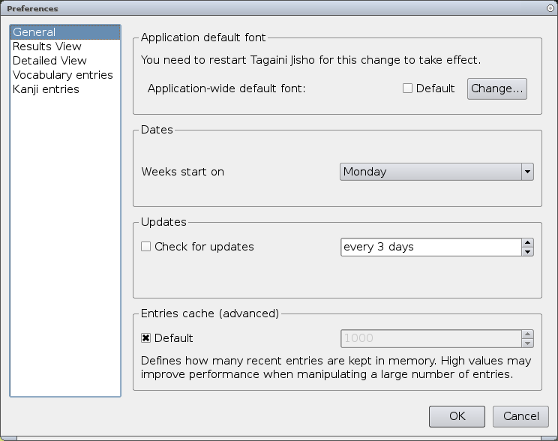
The first section, from the top, is the general settings section. It controls the application-wide default font, the font which Tagaini uses to display text by default, and the GUI language, the language the menues and buttons are written in. The default font has two settings. A check box labelled default and a button labelled ‘Change…’. If the default check-box is ticked then the default Qt system font is used. The change button brings up a dialogue that allows you to select a new font.
The next section is the dates section. It allows you to tell Tagaini which day the week starts on: Sunday or Monday. These settings are used by your study list. The following section allows you to tell Tagaini how often it should connect to the internet and check for a new version. You can turn this functionality off or you can get it to check for updates to the development version.
The Entries cache section specifies how many entries Tagaini will keep in memory. Increasing this value may result in better performance for users manipulating a huge number of entries, but the default should be safe for most cases.
Results View
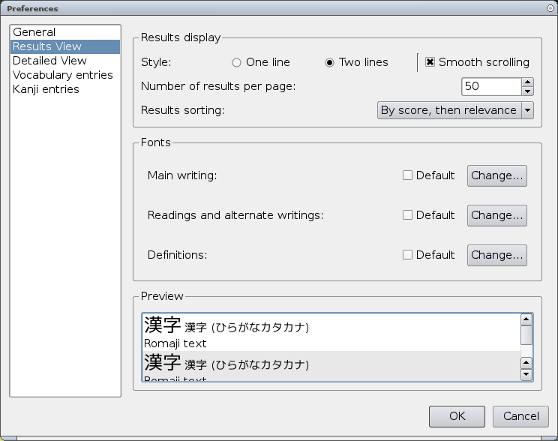
The results view page specifies how entries are displayed in the search panel.
The page is separated into two sections: The results display section and the preview section. The preview section shows an example of a list of entries that will be displayed in the results view.
The results display section specifies the format of each entry. Smooth
scrolling changes how scrolling behaves. The number of entries per page can
be changed, as well as how results are sorted: By score, then relevance or
just by relevance. Entries can be displayed on one line, or over two with
the definition underneath the reading.
Each of the different parts of a listed entry can then be displayed in a different font; The main writing section is the first kanji or kana which shows how it is usually written. Readings and alternative writings specifies how readings are displayed and definitions refers to the Romaji text that the meaning of the entry is displayed in. The default font is a system default.
Detailed View
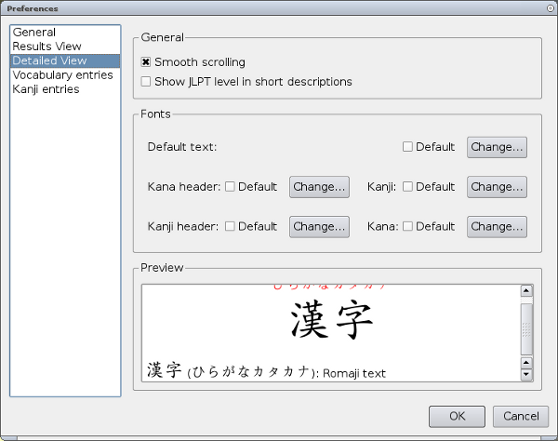
The detailed view preferences page describes how the detailed view should be displayed.
The fonts section specifies each font used in the detailed view. There are five in all.
- Default text
- The font to use with any non-Japanese characters.
- Kana header
- The red furigana reading, centred above the large kanji text.
- Kanji header
- The large centred kanji text, signifying the main reading.
- Kanji
- Any kanji in the display, for alternative writings and referenced entries.
- Kana
- Any kana in the display, for alternative readings and referenced entries.
Lists
The lists page describes how lists should be handled and displayed. The style of the list can be changed between one line entries and two line entries. The fonts used to display the main writing, Readings and alternative writings and definitions can each be changed separately. Smooth scrolling can also be enabled.
Vocabulary Entries
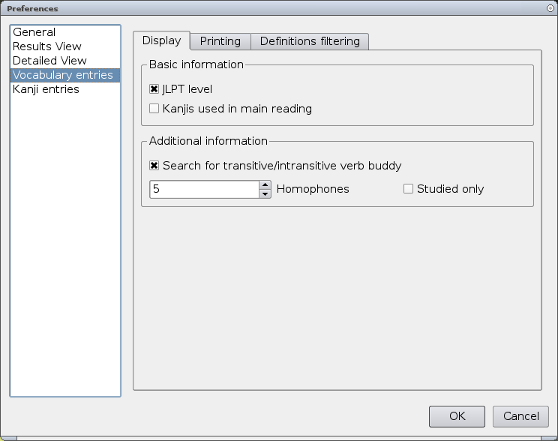
The basic information section specifies whether or not the entries JLPT level and information about the kanji used are displayed in the detailed view.
The additional information controls extra jobs about the displayed entry. Search for transitive/intransitive verb buddy controls whether or a references is included to an entry with an opposite transitive state. It is also possible to search for a given number of Homophones or Homographs. The Studied only check-box causes only homophones or homographs in the study list to be displayed.
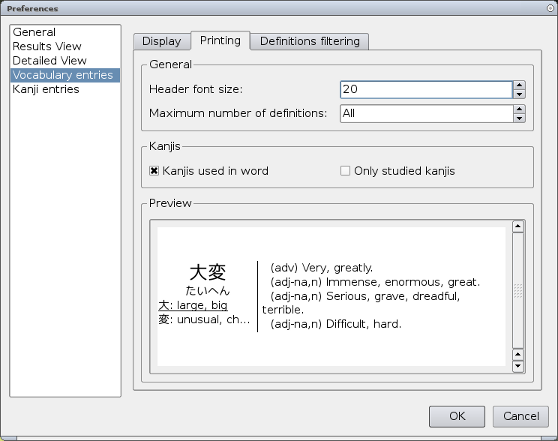
The printing tab defines how entries look when printed. The general section has the header’s (The main reading) font size and the maximum number of definitions.
The kanji section specifies whether or not to show each kanji’s meaning separately underneath the header, and if only to show studied kanji.
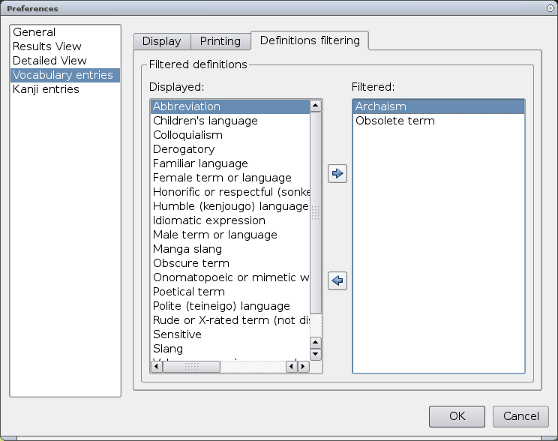
The definition filtering allows the filtering of Terms. By default, obsolete terms and archaisms are filtered out. This stops entries marked as such from being found by searches. To filter out additional categories, select them in the displayed section and press the arrow button that points to the filtered section.
Kanji Entries
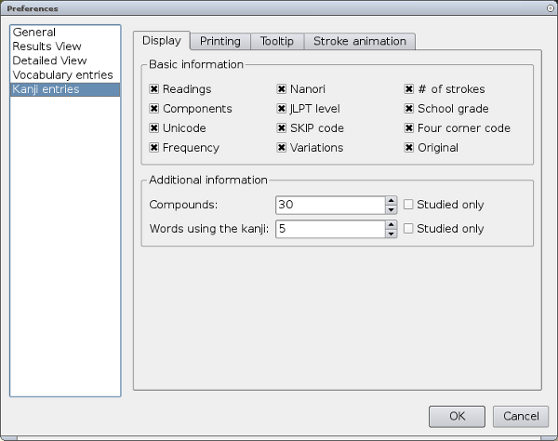
The display tab, the first of four tabs on the kanji entries page, describes which information should be displayed in the detailed view.
In basic information, there are a series of check-boxes relating to different pieces of information in the entry. Each one toggles display of that element on and off.
- Readings
- On and Kun readings.
- Nanori
- Nanori reading.
- # of strokes
- Number of strokes in the kanji.
- JLPT level
- The JLPT level of the kanji.
- School grade
- The grade the kanji is taught at school.
- Unicode
- The kanji’s Unicode value.
- SKIP code
- The kanji’s SKIP code.
- Four corner code
- The kanji’s four corner code.
- Frequency
- The frequency rating of the kanji.
- Variations
- Any variations in the strokes of the kanji.
- Original
- The way the kanji was originally written.
The additional information section allows you to toggle on and off radicals and components being shown as well as contoling how many compound kanji (kanji that uses the currently displayed one as a component) and how many words using the kanji are shown.
- Components
- The kanji radicals used in the kanji.
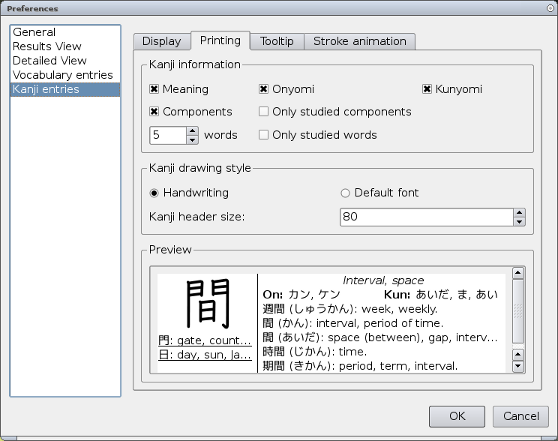
The printing tab controls how kanji entries look when printed.
The kanji information section controls what is displayed, whilst Kanji drawing style controls the appearance of the kanji - either hand-drawn rendering or system font. Preview is an updating preview, using the entry for 間.
The values in kanji information are:
- Meaning
- The kanji’s meaning
- Onyomi
- The on reading, or 音読み。
- Kunyomi
- The kun reading, or 訓読み
- Components
- The kanji’s components.
- Only studied components
- Only show components that are in the study list.
nwords- Shows
nwords using the kanji. - Only studied words
- Filter out words not in the study list.
If components printing is enabled, studied components are underlined.
In the kanji drawing style section the kanji’s size is set, along with if it is written in a handwritten font, or in the default font, whether or not it is printed on a gird and if the stroke numbers should be included.
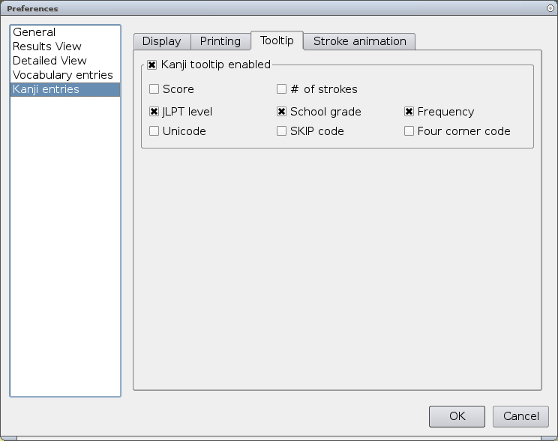
The kanji tool tip, that shows up when the mouse is hovering over a kanji in the detailed view, is a yellow box which displays the kanji; its first reading and its meanings. The options on this page toggle on/off additional information.
- Kanji tool tip enabled
- Enables the tool tip.
- Score
- Shows the score colour for entries in the study list as the tool tips background colour
- # of strokes
- Show the number of strokes.
- JLPT level
- Show the kanji’s JLPT level.
- School grade
- Show the kanji’s school grade.
- Frequency
- Show the kanji’s frequency.
- Unicode
- Show the kanji’s Unicode value.
- SKIP code
- Show the kanji’s SKIP code.
- Four corner code
- Show the kanji’s four corner code.
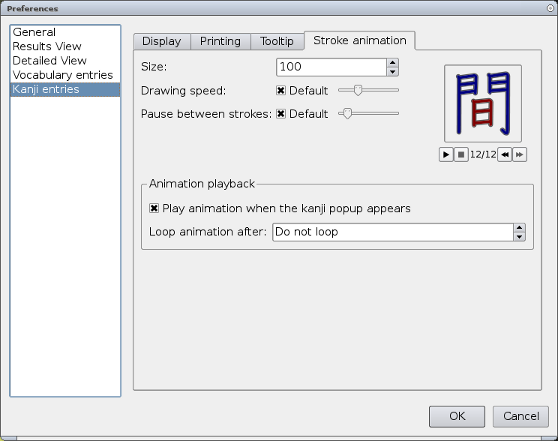
The stroke animation tab controls the stroke order animation on the kanji popup.
Troubleshooting
Unable to read Japanese
If you are unable to read Japanese text, you probably don’t have any Japanese fonts installed. You will likely have to install the Japanese language pack in windows and Mac OS X. To get Japanese support in Linux please see your distribution’s documentation, if the information and links provided in Tagaini’s Install Guide were insufficient.
Unable to type Japanese text
Inputting Japanese text is not handled by Tagaini, instead by what is called an Input Manager. You will need to install and use one of these to input Japanese text. For instructions on installing an IM, please see Tagaini’s install guide.
Other Bugs
If you have an issue that is not listed above, you may wish to check Tagaini’s bug tracker on Github, or the mailing lists. Chances are that someone else has already reported the problem and a work around has been posted. If no one else has reported the bug, then please feel free to do so.
Contact
For development-related contact and user questions we ask that you use Github’s bug tracker or the mailing list. The latter can also be used for informal discussion about Tagaini’s development.
This manual has been written and maintained by Neil Caldwell and Alexandre Courbot, and Tagaini Jisho is copyright Alexandre Courbot.
-
Open Source Software: Software that has been released for free by its author, along with its source code. ↩︎
-
Wild cards are characters used to represent unknown characters in search terms. ↩︎
-
Just setting the status to not studied without any other search criteria will cause every entry not in the study list to be listed. This is likely to be a very large number of entries. ↩︎
-
See [Study List][] for more information on practising with your study list, as well as manipulating it. ↩︎
-
http://en.wikipedia.org/wiki/Japanese_Language_Proficiency_Test ↩︎
-
A session is started each time you run the program. If you run Tagaini, use it for five minutes and close it, then that is one session. If you run it again five minutes later then you are running a different session. ↩︎
-
Right click menu. ↩︎
-
The part-of-speech can be clicked in order to display its complete definition. ↩︎